The Best Central Line Ever… Tribute
The best central line ever….. tribute
Placing a central line is one of those procedures that can be done in many ways. The last 10 years or so has seen an evolution of the kit, ultrasounds and techniques… so my current set up and routine bears little resemblance to that when I trained.
This article is an attempt to consolidate some useful tips, thinking, and evidence that can shape our practice. I do not think that there really is a single “best” way to do a CVC as a lot of the decisions are based in your context, the patient factors and the training you have received. In reality, we all need to have a few tricks in our toolbox to do this well.
WHO?
CVC insertion is a core skill for ED and Anaesthetic practice – it should be part of the basic training. This is a complex skill that requires close supervision to learn well. This is hard/impossible to get once one is out of training and in practice. So it should be learned in training – ED, Anaesthesia or ICU early on!
The use of US is now obligatory in all but the most urgent “crash lines” and therefore one needs to have good procedural US skills to allow us to track the needles to target vessels safely. I will come back to this point repeatedly as this is the key to avoiding harm with CVC insertion.
Having a dedicated assistant is super helpful :
- speeds up the initial set up (the longest part of the task)
- Get the US cover on and fiddle with knobs etc
- Provide patient reassurance and hand holding
- Decrease anxiety and monitor the patient for pain etc under the drapes
There is some evidence [Pronovost, NEJM, 2006] that just having a nurse/assistant watch you and ensure sterile techniques and appropriate glove, gown and mask can reduce the rate of line infections. This should be routine for sterile lines in all but the most urgent scenarios.
WHAT
Your kit will be largely determined by local policy. Personally, I use the same sterile bundle that we use for epidurals in the labour ward. It has all the prep gear, a large adhesive drape with a decent size fenestration in it.
You need a large trolley to lay out all the gear. Ideally, one that is 3 feet wide.
A sterile probe cover with at least a metre of sheath to allow you to drape the probe & cord over the sterile field and not have to chase it as it slips.
A swab and lignocaine syringe if you are doing a superficial cervical plexus (SCP) block… not on the sterile setup.
A 3 or 4 lumen CVC. [ Placing a 2-lumen line in an adult seems like a waste of time IMHO. ]
WHERE
CVC s need space. I have never regretted moving the patient to a well lit, open area where one can:
- walk around the head end of the bed,
- spread out kit on a decent-sized trolley and
- arrange the US to optimize procedural ergonomics.
So the general rule is to do in a Resus Bay, operating theatre or an ICU bed with appropriate space. Doing this on a standard ward bed is just making a challenging task a little bit tougher.
Doing this in a small aircraft is nearly impossible – so we often place CVCs in anticipation of transfer where multiple infusions and reliable access are needed. This is the polite thing to do if we are working with our aeromedical team well.
WHY
In the last 10 years or so the indications for placing a CVC have changed quite a lot. It is somewhat easier to discuss the reasons NOT to place a central line. Here are a few….
- volume Resuscitation is rarely if ever a reason for a CVC. Large bore peripheral lines suffice for the vast majority of hypovolemic cases.
We have moved away from large volumes of crystalloids in trauma, sepsis, and most medical Resus scenarios. In my opinion, there is a risk of overdoing Resus fluids if we have lines that can quickly deliver a litre. Sure, we can restrain ourselves, but in practice, it is common to see a drip left wide open and a litre go through before a thought is given.
There are better, faster ways to get access in a rush, or where the patient has limited peripheral veins. One might consider :
-
-
- the “dirty external IJ”,
- intraosseous or
- RIC kit
-
… to get large volumes in quickly…. but a narrow gauge, long CVC is not a great option in hypovolemia. Some docs might have experience with placing a large gauge central line eg. Cordis or sheath. However, this is not the time to learn!
- Monitoring CVP was super cool when I trained. Then we started to see the folly of this endpoint (Marik’s classic 7 Mares metanalysis paper)….in 2018 it is rarely done other than for a few indications
- Measuring CVP can be used to confirm venous placement [though probably not required… see below]
- It may be useful as a marker if it is very low, suggesting inadequate volume
- As a dynamic measurement of volume status if you believe in, or have time to do passive leg raises etc..
- In complex heart disease.
- Infusion of vasoactive drugs has traditionally required a central line, though in recent times the use of peripheral vasopressors in the first 12-24 hrs is widely accepted as safe and utilitarian
- Having said that patients needing more than ~ 12 hrs of vasopressors usually require a central line. I usually opt for a central line if a transfer is happening- as they will get one anyway and this gives the transfer team a good, robust access point.
- Difficult peripheral access was a reason to place a central line in my training…. however, nowadays with US-guided longer lines / PICCS we can usually get a reliable peripheral site. So I think that we can avoid central lines for this indication if the option to place a midline or PICC is available. Having said that, if the patient has another indication for central access, then don’t place a PICC.
So then… who should get a CVC?
- often this is based on the predicted clinical course.
- Patients who are likely to need ongoing vasoactive or other infusions will benefit, and the nursing will be easier, especially where multiple drugs with compatibility issues, antibiotics etc are being used.
- Where frequent blood sampling is needed eg, bad DKA, electrolyte manipulations, toxicology etc I reckon a CVC can be a humane way to go. Gives good access and avoids a course of phlebotopuncture. If that is looking likely then place a CVC early to get maximum benefit ie. not after a dozen peripheral lines have failed… that is torture!
- Usually there are numerous reasons to put in a CVC. So it makes sense if it is making the patients experience better and safer… but you need to weigh that against the risk of injury from insertion (see risks below)
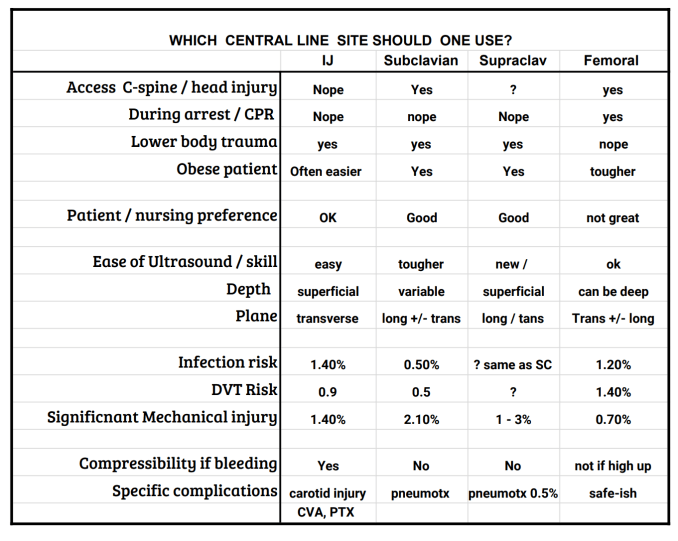
WHICH SITE?
If you want to start a fight, argue for one anatomical site for a CVC on Twitter… easy!
There are really 3 options:
- internal jugular (right side is easier)
- Subclavian (true subclavian / proximal axillary / supraclavicular subclavian )
- Femoral
Each has advantages and downsides so I will describe how I use them.
You need to be adept at 2 or 3 techniques at different sites as there will always be times that you need to go for your 2nd or 3rd choice
Importantly the first step to placing the line is a scout scan to ensure the anatomy is suitable- so the best site is often where the scan use easier in an individual patient. ( I have been burned by trying to place an IJ in a haemodialysis patient with a severe “steal” and near non-existent neck veins!)
The old arguments about clean vs. dirty sites were largely put to bed by Marik’s review of the topic [Marik, Crit Care Med, 2012] all are equal for line infections…. however, the research and subsequent reviews are all based on patient data in the context of common sense. We see a lot of macerated, fungal groin folds in Broome! So just because the data says that the site are equivalent you still need to use your eyes to pick a safe site. A dirty groin is a dirty groin, go elsewhere.
However, all else being equal, don’t let site infection influence your choice
The ability to “compress” the bleeding if you nick an artery is always tricky, especially in the patients on anticoagulants.
- The IJ is compressible, sort of…
- The myth is that the femoral vessels are compressible which is not always true. They are often quite deep and drop off into the pelvis to be inaccessible. So if you are worried about bleeding then you should probably go for an IJ or a more distal femoral puncture site.
- The subclavian lines are incompressible
Having said that, if you are really worried about bleeding- I think your best bet is to get the most experienced operator to place the line. This is a poor time to learn! (NATO: not a teaching opportunity!)
Technically I think that the IJ is the easiest site. Superficial vessels, consistent anatomy. There is a small risk of carotid cannulation which still happens ( I have even seen a line in a vertebral artery!!) There are a number of tips to making the IJ insertion and scanning easier – videos forthcoming…
Use a superficial cervical plexus block if you have time… I like this for the awake, but confused, old lady CVC especially. Seems nicer, they often nod off and there is less moving about at the crucial points.
Femoral is also not too hard for thinner patients… but can be tough in obese people.
The subclavian is hardest in terms of scanning and carries a significant risk of pleural injury/pneumothorax. However, with practice, it may be as easy to scan as any other site.
Having said that – in awake/conscious patients the neck can be a sensitive area, the subclavian is a bit nicer and probably more convenient to nurse if it is going to be in there for a while / more than a day or two. Every ICU nurse I asked when writing this named the subclavian as their preferred site for ease of care.
Feedback from a few very astute Anaesthetic docs has suggested that the SUPRACLAVICULAR subclavian vein site is quite useful. This essentially involves puncturing the subclavian vein just above the clavicle at/near the junction with the IJ. This is not something I have done in the past but it makes a lot of sense from an ultrasound and a nursing perspective.
CVC Confirmation techniques
I will run through the pros and cons of each. But… before I do, let me tell you that I really DO NOT agree with the basic premise here. Detecting an error, where the line has inadvertently been placed in the carotid (or other bad places) needs to happen before the line is placed. That is – after the guidewire is inserted, but BEFORE the injury is caused by DILATATION.
Confirming that the line is in the right place is something that we do. Most hospitals have protocols that govern this. [eg. no use until the CXR is checked was the play when I was an intern]. The most common confirmation techniques are:
- CXR – does it really tell you anything other than the depth? And how important is that information anyway?? [Farkas on central line position]
- Gas analysis – sure – go for it, requires you to hand off and have access to VBG in quick time. Otherwise, it adds a lot of time, a pause in the procedure prior to dilation. Though this is the easiest to do if your system is set up well.
- Transduction – this is always after-the-fact, fiddly to do and remain sterile
- A variant on this is to use the wire’s packaging sheath as a manometer.
- The ECHO flush – hard to do once again whilst sterile – unless you prep the right places. I use this to check position eg. the flush should appear rapidly in the RV otherwise there is a good chance your catheter is misplaced/has gone down the arm or wherever they seem to go!
All of the above techniques are examples of “closing the gate after the horse has bolted”. Sure, do them if your hospital says that you need to … but if you really want to avoid inserting the catheter into the wrong vessel I think we need to add another mandatory step:
- Use the catheter-over-needle technique as per Dr Strayer (see vid)
- Use US to guide the needle into the vessel and slide the flexible plastic catheter into the vessel.
- Keep the probe hand (if you use the one-handed technique – the probe never loses sight of the catheter.)
- Introduce the guide wire just to the tip of the catheter – then the catheter will shine out with a bright reverb artifact – and scan in transverse and long axes to confirm it is where you think it is.
- Then you can advance the wire into the vessel under direct vision – watch it in long access AND transverse if the anatomy allows so you are sure it is in the right vessel.
- Often the wire will lay on the back wall of the vein. It can be difficult to be sure that this is truly in the vein and not out the back… try bouncing the wire by gently bouncing the section of wire just outside the skin – it will move the wire into the centre of the lumen if it is in the right place.
- Now you can relax – you cannot be more certain that the wire is in the vein.
- Dilate, then carry on with the catheter,
The usual technique lacks this second scan. Most folk I see put down the probe (or even hand it off) as soon as the needle is in a vessel and blood is aspirated. The trouble here is that in those 2 seconds where the probe is put down and the wire picked up and threaded can be the moment where the needle slips out the back wall! The advantage of this technique is that you only place a small hole in the wrong vessel. This is unlikely to cause too much drama and you don’t spend a few minutes grinding a dilator through the wall of a large artery.
Also you are still sterile, you can pull out the catheter. Correct the problem and place the catheter into the right vessel. (the patient still needs the line after all!!)
So I think this should be routine / mandatory – PRE-dilation confirmation of site. This is a simple thing to do and requires no more kit than you have already on your setup. This is really the best way to avoid misplacement, rather than any of the traditional “confirmation” techniques.
In terms of other microskills to placing a central line – I highly recommend the series of videos the Scott Weingart produced a few years ago. It is strange that we never actually teach, or get taught these simple tricks / hacks. Certainly, I was never instructed how to “rack n pull” or “dilate and twist” Check out the videos HERE
I will try and post a video of my preferred “one-handed, catheter advance” technique that allows you to maintain continuous ultrasound visualisation throughout the needle and catheter insertion… no more probe down moment! Watch this space…
AUDIO PODCAST version BELOW
Thanks to MJ Slabbert, Justin Morgenstern, David Ruslan and Johnny Wilkinson for feedback and critique…
REFERENCES
Ruben Strayer (EMUpdates) on the “wire through Catheter technique”
http://emupdates.com/2015/07/11/a-better-central-line-technique-wire-through-catheter/
Mike Stone – Wire-in-needle technique: http://www.ultrasoundpodcast.com/2013/02/wire-in-needle-a-win-for-needle-visualization-foamed/
Boston EM CVC insertion using one-handed WIN technique https://bostoncityem.com/2018/05/18/the-wire-in-needle-win-technique/
Weingart EMCRIT Central Line microskills series includes all the steps in a Seldinger technique.
https://emcrit.org/emcrit/central-line-micro-skills-deliberate-practice/
https://emcrit.org/emcrit/microskills-dilation/
Mike Stone on the true subclavian POCUS technique
https://vimeo.com/265475711?ref=em-share
Josh Farkas and the Shrug technique for SC lines
SUPRACLAVICULAR APPROACH – thanks MJ and Johnny Wilkinson
Soundbytes, Dr Perera on the US-guided supraclavicular
3SITES complications of CVC trial in NEJM
https://www.nejm.org/doi/full/10.1056/NEJMoa1500964
nbsp;
Podcast: Play in new window | Download
Subscribe: Apple Podcasts | RSS


About The Author
Casey Parker
I am a GP working in Broome, NW of Western Australia. I work as a hospital DMO (District Med Officer) doing Emergency, Anaesthestics, some Obstetrics and a lot of miscellaneous primary care. Also on the web as @broomedocs | + Casey Parker | Contact
Hi Casey, thanks for the great summary of CVC considerations. I wondered if you might be able to post the link to the evidence you mention that vasopressors are safer through a CVC vs. peripheral cannula if given for more than 12-24hrs. I occasionally come across patients on peripheral noradrenaline for >24hrs and it’s my understanding that central access would be safer primarily regarding the risk of extravasation but it would be great to have some data to support this.
Also you mention your preference for CVCs over PICCs in the acute setting. My practice is the same but I have seen PICCs routinely used for vasopressors where frequent blood sampling isn’t necessary (e.g. can be done through an artline) and many/incompatible infusions aren’t needed . PICCs may also avoid some potential complications of CVCs. Do you think there is any other risk/disadvantage to using a PICC, e.g. in septic patients requiring vasopressors?
Lastly, do you have any thoughts on patients receiving vasopressors e.g. noradrenaline for >12-24hrs without arterial blood pressure monitoring – often in conjunction with a peripheral vasopressor. My understanding is that invasive BP monitoring is more reliable and should be instituted once the resus situation is stable and time permits but again I don’t have hard data to support this view e.g. implementing invasive BP monitoring asap vs. within 12-24hrs vs. >24hrs.
Best wishes and thanks for the input!
Andre Mareyo (rural generalist/anaesthetics)
See post entitled
“Pushing pressors in the periphery”
HI Andre
The evidence for peripheral noradrenaline is linked tot this older post: https://broomedocs.com/2015/05/podcast-pushing-pressors-in-the-periphery/
There has been a review published which uses the same base data.
There seems to be a rise in the risk of extravastation after 12 hours. I think that in reality it means that peripheral pressors are OK to get you either “through the night or the flight” to a time and place where a competent clinician can be awake and in a suitable place to place a CVC safely.
I think that the best alternative to a PICC is probably a “midline” catheter. We do not yet have these in our shop but they seem to solve the problems of using peripheral drips and do not have the risks of a CVC. My current practice is to place a long catheter into a big proximal vein eg a femral art line kit into the cephalic if I am likely to be using pressors through it.. and it needs to be a nice clean, non-traumatic drip insertion.
I think if you are running pressors as a continuous infusion (i.e. not just a few boluses of aramine) than you should be placing an arterial line. They give a reliable measure in patients where the BP can change quickly and the nurses can titrate to it more sensibly. Art lines placed under a generous local anaesthetic are the most humane way to monitor BP and get blood samples – it can be near painless if done well.
Hope that helps
Casey